How To Upgrade Your Mac Mini with an SSD (2023 updated)
The definitive guide
The Apple Mac Mini has a loyal fan group around the world. They are a hackers delight, in the true sense of the word. Hacking to make them more functional.
Whatever your use of the Mac Mini, be it media server or desktop computer, the one upgrade that will make the biggest impact is a SSD.
There are many options in upgrading a Mac Mini, and that is why we have created this guide. Everything we know, in one place, to help you the community get the most of your Mac Mini.
It is a free download if you want to save it to read later. We appreciate all feedback and additional information. In a way, we do rely on you the Mac Mini user to give us additional information. That will be added here, and shared with everyone else.
Don't forget to like and share if all this information has been helpful, that would be awesome...buying one of our SSDs would be even better :-)

Introduction
Normally we start these guides with why an SSD is fast, and why it will change your life. All Mac Mini users know this, they are use to squeezing the most out of their machine to be more productive.
When ordering from Upgradeable, it is important to let use know you are upgrading a Mac Mini. Type your model number in the customer notes at checkout. This helps us provide you with all the right tools.
The way we structure these guides is by using our "Four R method". It is named this way because each step starts with the letter R.
REPLACE, RESTART, READY and RESTORE.
The idea is to present all the different ways to upgrade your Mini in a methodical and easy to remember format. If you need more detailed information or need help planning an upgrade, then please use our awesome customer service team. Yes, they answer the phone, like to be challenged with hard questions, and don't mind answering the easy ones too. There are no silly questions at Upgradeable, we are happy to help, even if it is just to make sure you are ordering the right product.
Chapters
Four R method: Time Machine
The easiest way to upgrade to a new SSD is to use Time Machine. All you need are tools and the SSD! You can either restore a whole back up, which includes macOS or you can migrate using the Time Machine after installing a new macOS.
REPLACE
Remove your old hard drive, and install SSD. We provide detailed printed instructions when you order an SSD, just include your Mac Mini model in the notes at checkout.
RESTART
Plug Time Machine into the USB port. If you have a wifi time capsule make sure it is turned on. Restart your Mac holding down the Command and R keys (this is Recovery Mode). The Mac will use the Time Machine to build the OS Utilities page.
READY
As the drive is shipped to you unformatted, you need to initialise the SSD to get it ready for the transfer of data. There is an option after you click into Time Machine called Disk Utility. You need to choose format type (must use APFS for Mojave or High Sierra, earlier versions use mac extended journaled) and a name, you can use Macintosh SSD or get creative and give it a person's name like MiniMouse. Click apply and this will format the SSD.
RESTORE
After formatting the drive your Time Machine back ups should be onscreen. Choose the latest, and the Mac will ask if you want to restore back up? Yes. Done. Time Machine will now start restoring onto the new SSD. It will take a while, approximately 100gb per hour.
Software and tools you need
The great thing about a Time Machine restore is you only need the SSD and tools to open the Macbook Pro.
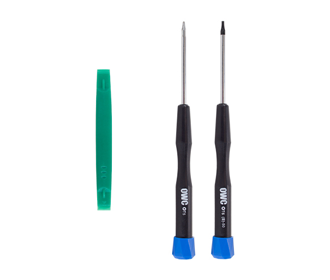
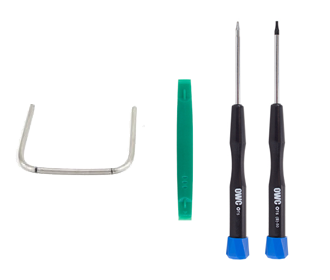
• Screwdrivers (Phillips #00, Torx T6 and Spudger)
• Choose an SSD drive here
• Don't have a Time Machine backup? Read the Apple guide on Time Machine backups
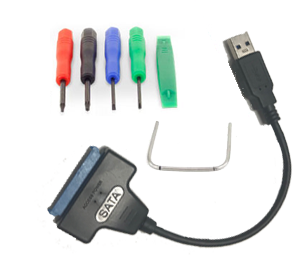
Four R method: Cloning (2006-2014)
These are instructions for 2006 to 2014 Mac Mini .
Cloning allows you to make an exact copy of current hard drive to the new the SSD. The benefit is software does not have to be reinstalled.
The process is largely automatic and the cloning takes 2-5 hours depending on the size of your drive.

READY
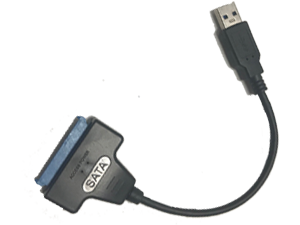
Connect the SSD to a spare USB port using a USB to SATA cloning cable (sold separately).
RESTART
Restart your Mac
Do not allow macOS to turn it into a Time Machine drive.
RESTORE
Download and Install Carbon Copy Cloner software (30 day free trial software link is below in the green box). As the drive is shipped to you unformatted, you need to initialise the SSD to get it ready for the cloning by initialising the SSD. Clone your hard drive using Carbon Copy Cloner.
REPLACE
When cloning is complete, power off your Mac and replace the hard drive with the newly cloned SSD. We ship detailed printed instructions with your SSD order
Software and tools you need
Cloning is an excellent way to quickly copy your current drive onto a new SSD. You just need a cloning cable, SSD and tools to open the Macbook Pro.
• Screwdrivers (Phillips #00, Torx T6 and Spudger)
• USB to SATA cable (needed to connect the new SSD to your Macbook's USB)
• Carbon Copy Cloner download by Bombich (30 day trial).
• SuperDuper! software by Shirt Pocket (free download).
• Choose an SSD drive here
Four R method: Cloning blade SSD (2014)
The 2014 Mac Mini shipped a M.2 blade option for storage. The M.2 is a proprietary drive, which means you cannot use a standard NVME drive like the Samsung 970 EVO. The OWC Aura Pro X2 is a compatible SSD, however your Mac Mini must be on macOS High Sierra or above and the SSD formatted as APFS.
This method uses OWC Aura X2 with Envoy Pro and Internet Recovery to clone. If your Mac is pre 2010 then you will need a macOS installer USB (see note below on how to make one).
REPLACE
Power off your Mac and replace the original Apple SSD with the new
Aura X2 SSD. Install the Apple SSD into the OWC Envoy external case.
RESTART
Plug Envoy into USB. Restart your Mac holding down the Command and R keys (this is Recovery Mode). The Mac will build the OS Utilities page.
READY
Go to Disk Utilities and initialise the SSD. Must be initialised as APFS format.
RESTORE
In the left hand window pane of Disk Utilities select the new Aura X2. Click on Restore button on top menu. A pop up window will ask for “Restore from:” Select your original SSD that is in the Envoy case. Disk Utilities will now clone your old SSD onto the new Aura X2.
Software and tools you need
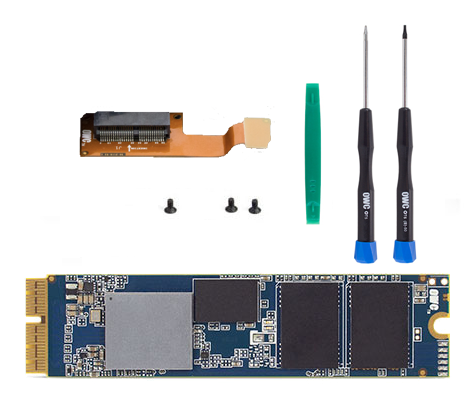
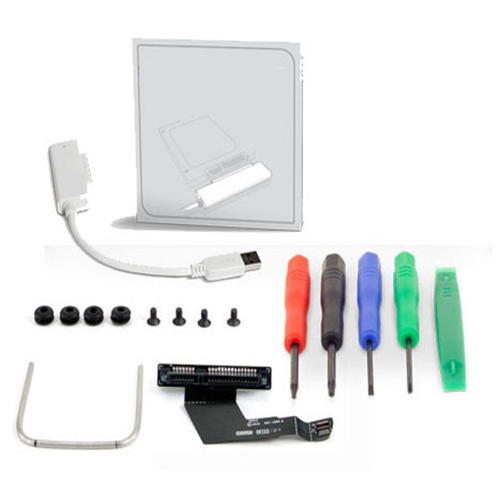
Our SSD KITS for the 2014 model includes everything you need to clone.
Kit includes SSD, printed instructions, and tools.
• Choose an SSD drive here
Four R method: Fresh macOS

Sometimes a Mac needs a fresh start. Apple makes it easy to reinstall macOS.
MacOS can be installed via Recovery Mode or via a macOS USB. We have previously recommended USB installers but Apple has updated and improved Recovery install. Restarting the Mac holding down Command - R will give you the OS previously installed. More detailed info is in our How to install macOS section.
READY
This method takes a little bit of planning. OSX or macOS (as it is now called) can be installed on an empty SSD via Recovery Mode or installing off media such as a USB. If you are installing from USB, you need to make that macOS USB before you start. Recovery Mode is installing the macOS from a Time Machine or a Mac drive recovery partition or Internet Recovery.
RESTART
Shut down your Mac.
REPLACE
Replace the hard drive (HDD) with the new SSD (reuse any mounting screws and brackets).
RESTORE
If you are installing macOS from USB, then insert macOS USB, hold down option key and restart Mac. If you are using Recovery mode, plug in your Time Machine or Mac drive (you dont need them if you have internet), restart the Mac holding down the Command + R keys. The Mac will create the macOS Utilities page that has options such as Disk Utility and install a new macOS. Whichever method you choose, the new SSD first has to be initialised (erased) first via Disk Utility. See How to install a macOS for detailed information
Software and tools you need
There are many options when starting fresh. You can install the current version of macOS or a later version that is more compatible with your apps and programs. You can put the latest macOS on your new SSD then use the Migration Assistant to copy over data and programs. You do not have to connect to another Mac, you can connect to a Time Machine or external startup disk to transfer files!
• Screwdrivers (Phillips #00, Torx T6 and Spudger)
• Familiar with how to Internet Recovery macOS or have an macOS USB drive.
• Choose an SSD drive here
The Upgradeable Team is here to help. If you want advice or check with an expert, please call, chat or email.
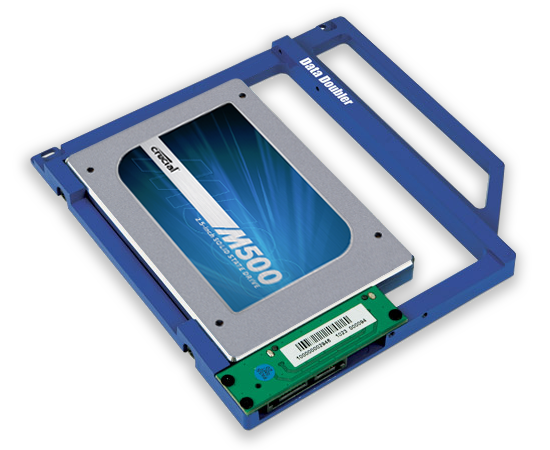
Second drive in DVD Bay (2009-10)
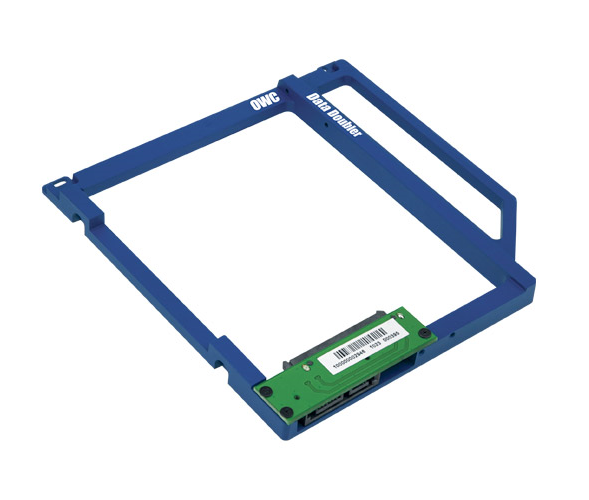
The 2009 and 2010 Mac Minis (not server version) can have two drives by replacing the optical drive with a Datadoubler bracket. Turn your Mac Mini into the server version. There are a lot of uses for a two drive Mac Mini: RAID the two drives, use the second drive as extra storage or a Time Machine. Please watch installation videos first to make sure you are comfortable do a complicated install. Alternatively, Upgradeable offers an instore installation service.
Physical installations
Fit the new drive on the Datadoubler bracket. Remove optical drive (DVD) and replace with the Datadoubler. (full printed instructions are included with order). We recommend watching installation videos first. You should now have two drives: your old hard drive and the new SSD in the optical bay.
Restart your Mac
Power on your Mac Mini holding down the option key (this starts the boot manager and shows all drive you can boot from). Your old hard drive should appear onscreen as a device to boot from. Select and start up macOS.
When the Mac starts up, do not allow the system to use the new SSD as a Time Machine.
Initialise the new SSD
The new SSD needs to be initialised (formatted). Open Disk Utility (in applications), select the new SSD. Click on Erase. Give the new drive a name such as "Macintosh SSD". You need to choose format type (usually Extended Journaled). Next option is Scheme (if available): Choose GUID Partition Map. Erase. The drive is now ready to be used.
How are you restoring macOS?
Will you be cloning your old drive onto the new SSD? Or using internet recovery or a macOS USB to install a fresh install of macOS. If you are cloning, install SuperDuper! software and clone your hard drive (in optical bay) to new SSD. If you are putting a fresh version of macOS on the new SSD follow the instructions listed in the Four R method: Fresh macOS
Two bootable drives
There are now two bootable drives, you need to make sure macOS uses the right one! In StartUp Disk (in system preferences) choose the new SSD as the drive the system uses to restart the Mac.
It is a good idea to use the new SSD for a while. Make sure everything is ok. If you do not need the 2nd drive as a backup and the new SSD is working perfectly you can erase the original drive in Disk Utility. The 2nd drive can be use as a Time Machine for back ups or use as internal storage.
Software and tools you need
This upgrade is complicated, so we provide printed illustrated guides and free phone tech support if you need help.
• Data Doubler bracket for Mac optical bay
• SuperDuper! software by Shirt Pocket (free download). Or familiar with how to Internet Recovery macOS or have a macOS USB drive.
• Choose an SSD drive here
The Upgradeable Team is here to help. If you want advice or check with an expert, please call, chat or email.
Second drive in 2011-12 models

The 2011 and 2012 (non server) Mac Mini models Mac Minis can have a second drive installed. Upgradeable sell a kit that includes all the tools, accessories and cables you need. Please watch installation videos first to make sure you are comfortable with this complicated install. Alternatively, Upgradeable offers an instore installation service. WARNING: some 2012 models shipped from Apple with the original drive in the upper bay not the usual lower bay. One of our steps below show you how to check. It is not a big issue, the same cable is used but in a different way.
Check location
To check the drives location, open Disk Utility and click on the grey drive icon at the left edge of the window. Click the "Info" button on the toolbar. A window will open. Scroll to the "Location" item; if you see "Lower" Do a standard installation. If it lists "Upper" then watch this install video and you will need a small wrench.
Physical installations
Fit the new drive in the lower or upper bay (which ever is empty, should be "upper").
Full printed instructions are included with order.
We recommend watching the installation videos first.
You should now have two drives installed.
Restart your Mac
Power on your Mac Mini holding down the option key (this starts the boot manager and shows all drive you can boot from). Your old hard drive should appear onscreen as a device to boot from. Select and start up macOS. If neither drive has an OS, then plug in a MacOS USB installer before restart.
Initialise the new SSD
The new SSD needs to be initialised (formatted). Open Disk Utility (in applications), select the new SSD. Click on Erase. Give the new drive a name such as "Macintosh SSD". You need to choose format type (must use APFS for Mojave or High Sierra, earlier versions use Extended Journaled). Next option is Scheme (if available): Choose GUID Partition Map. Erase. The drive is now ready to be used.
How are you restoring macOS?
Will you be cloning your old drive onto the new SSD? Or using internet recovery or a macOS USB to install a fresh install of macOS. If you are cloning, install SuperDuper! software and clone your hard drive (in optical bay) to new SSD. If you are putting a fresh version of macOS on the new SSD follow the instructions listed in the Four R method: Fresh macOS
Two bootable drives
There are now two bootable drives, you need to make sure macOS uses the right one! In StartUp Disk (in system preferences) choose the new SSD as the drive the system uses to restart the Mac.
It is a good idea to use the new SSD for a while. Make sure everything is ok. If you do not need the 2nd drive as a backup and the new SSD is working perfectly you can erase the original drive in Disk Utility. The 2nd drive can be use as a Time Machine for back ups or use as internal storage.
Software and tools you need
This upgrade is complicated, so we provide printed illustrated guides and free phone tech support if you need help.
• Second drive kit for 2011 and 2012 Mac Mini
• SuperDuper! software by Shirt Pocket (free download). Or familiar with how to Internet Recovery macOS or have a macOS USB drive.
• Choose an SSD drive here
The Upgradeable Team is here to help. If you want advice or check with an expert, please call, chat or email.
SSD options for the 2014 Mac Mini
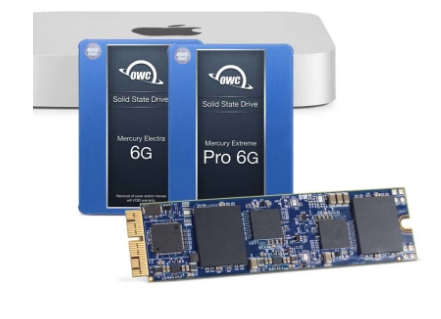
The 2014 model could be configured from the Apple factory with THREE different storage options.
1. SSD = m.2 PCIe blade
2. SATA drive = 2.5 inch SATA hard drive
3. Fusion drive = both a PCIe SSD and SATA drive installed.
Upgradeable sells kits that can add a second drive to both option 1. and 2.
M.2 PCIe SSD 2014 Mac Mini
You can replace your SSD with a larger faster Aura X2. You can not add two PCIe SSD blades. If you want a second drive, there is a SATA port on the motherboard. We sell a kit that includes tools and cable required to add a SATA SSD in the empty SATA drive bay.
SATA hard drive 2014 Mac Mini
You can replace your SATA drive with a faster 2.5 inch SATA SSD. There is no room in the model for two SATA drives as in previous models. To add a second drive you must add a PCIe cable. There is a free PCIe port on the motherboard. Upgradeable sells a kit (see the green box below) that includes tools and cable required to add a PCIe SSD (Aura Pro X2) to your Mac Mini.
Fusion Drive 2014 Mac Mini
If your Mac Mini 2014 shipped from Apple with a fusion drive, then your Mac Mini has both the SATA and the PCIe connector. You can replace the SATA drive with a 2.5 inch SSD and you can replace the original Apple SSD with a faster Aura Pro X2 NVMe SSD.
Software and tools you need
All these upgrades are complicated, but we do provide printed illustrated guides and free phone tech support if you need help.
• Add a SATA connector kit to a Mac Mini 2014 for models that shipped with a SSD only.
• Add a PCIe connector kit to a Mac Mini 2014 for models that shipped with a SATA drive only.
• Choose a 2.5 inch SATA SSD here
• Choose a PCIe blade SSD here
The Upgradeable Team is here to help. If you want advice or check with an expert, please call, chat or email.

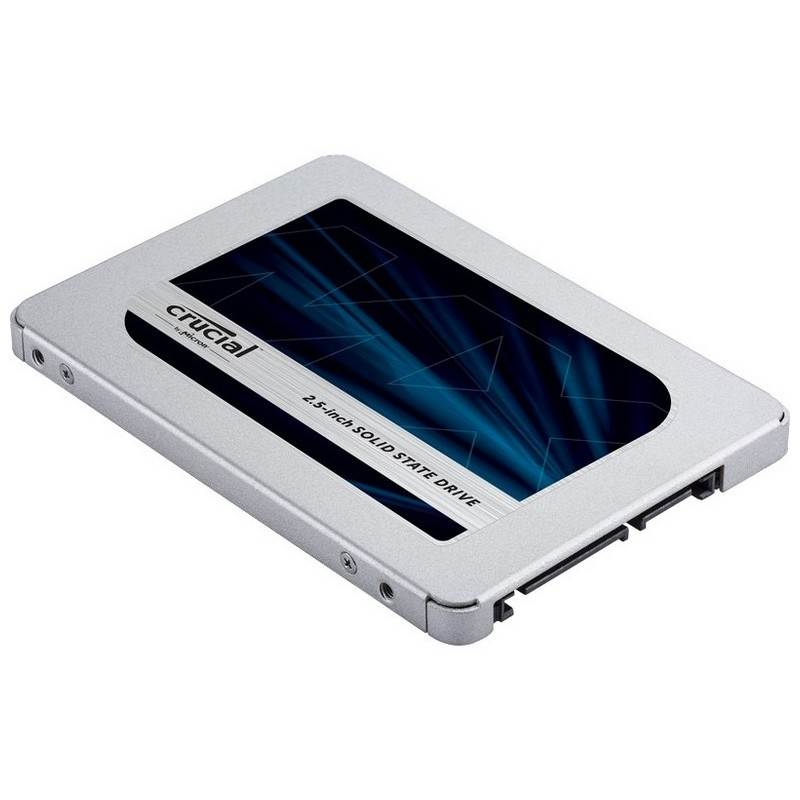
Choose an SSD for your Mac Mini
These SSD drives are a standard 2.5 inch SATA drive, compatible with the 2005 to 2012 Mac Mini range.
The 2014 model also had a SATA option, please see our notes on upgrading.


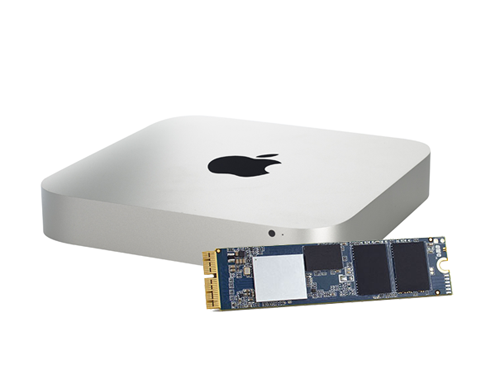
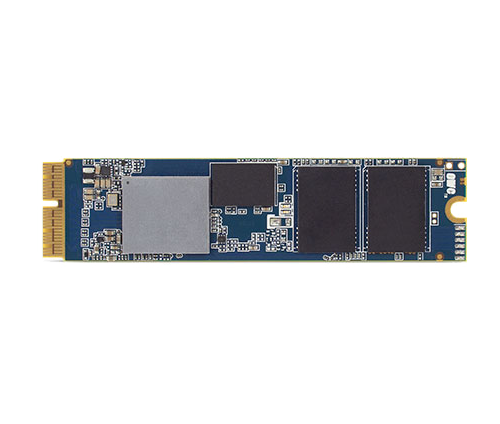
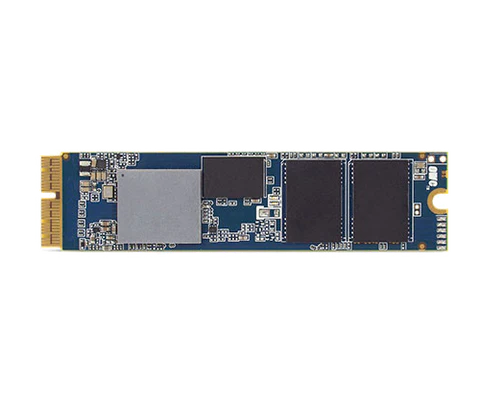
2014 Mac Mini NVMe SSD drives
In the 2014 model Mac Mini, Apple changed the SSD they used to a proprietary M.2 drive.
Proprietary here means an industry standard NVME drive is not compatible. OWC have created a third party SSD that is fully compatible and twice as fast as the original SSD.


Add a second drive kit for your Mac Mini 2014


Let us do all the work!
Not everyone wants to do their own installation. We offer an installation service at our Sydney Pymble office. An Apple qualified technician does all our hardware and software work. We match Crucial's warranty, so our labour warranty is also 3 years. This means if you have to claim your Crucial warranty, we will not charge a second installation fee!
How can I get my new SSD installed?
Below we have a full range of SSD drives with installation included. Just choose the size you want, there are no hidden extras. The price you see is the price you pay.
Accessories you need for a DIY installation
These are the kits or parts you need for a successful installation of your SSD. Add to your cart what you need with the SSD you have chosen. When checking out, don't forget to tell us in the customer notes which Macbook or Macbook pro you have, and we will include full printed instructions.


How to install macOS
Note: Updated October 2022: Apple has changed the way you can reinstall MacOS. Via Internet Recovery you can get the latest MacOS or the current version of MacOS on the Mac.To get the latest MacOS restart holding down Option + Command + R keys. This is the one we recommend because it has an almost 100% success rate.
To get the version of MacOS on your system, restart holding down Command + R keys. This usually gives you the wrong OS and is not recommended.
Unfortunately Apple does not have a way to select the version of MacOS you want. To get a specific version, make a USN installer.
Please note Macs earlier than mid 2010-2011 can not use Internet Recovery and require a macOS USB installer.
What format to initialise the new SSD?
From High Sierra, Apple has a new drive format structure. When you upgrade to High Sierra, Apple changes your drive format structure to APFS. High Sierra will only reliably work on a drive formatted as APFS.
If you are installing High Sierra the SSD needs to be in Mac OS Extended (Journaled) for the installer to recognise the SSD. The installer will change the SSD to APFS during the install.
To install Mojave, Catalina, Big Sur, Monterey, Ventura: initialise the SSD as APFS.
To install High Sierra, Sierra, El Capitan, Yosemite and earlier: initialise the drive as Mac OS Extended (Journaled)
How to get the latest macOS on a new SSD?
To reinstall using OS Recovery you need an internet connection, either wireless or ethernet cable. To start up using OS Recovery, start up your Mac and immediately hold down one of these combinations of keys.
Command-⌘-R
Reinstall the latest macOS that was installed on your Mac.Option-⌘-R
This will upgrade to the latest OS compatible with your Mac. (recommended)Shift-Option-⌘-R
Reinstall the macOS that came with your Mac, or the closest version that's still available.How to use Migration Assistant
Apple includes an awesome app called Migration Assistant that we have used to help customers start over with a fresh macOS but keep all their data and applications. Apple allows a lot of different installation and migration options. We will discuss the main ones here, but if this does not answer your migration question, please contact us for more specific information about the upgrade you are planning.
What is Migration Assistant...why should I use it?
Migration Assistant allows you to transfer applications, settings and data from another Mac. macOS can see "another Mac" as your old hard drive or a Time Machine back up. A mac can boot from an external drive, for example, if you put your old hard drive into an external enclosure, you can boot from it, and run that hard drive and it would be exactly the same as your old mac...because it is!
If you just want a new macOS, start fresh with no legacy upgrade data, then you can use Migration Assistant to reinstall all your data and apps, and you will have the benefit of a new macOS with all the apps and data from your old drive.
How to use Migration Assistant
After you have installed the new macOS, the system starts and asks for generic information: country, keyboard type etc. The next part of the installation setup is Migration Assistant.
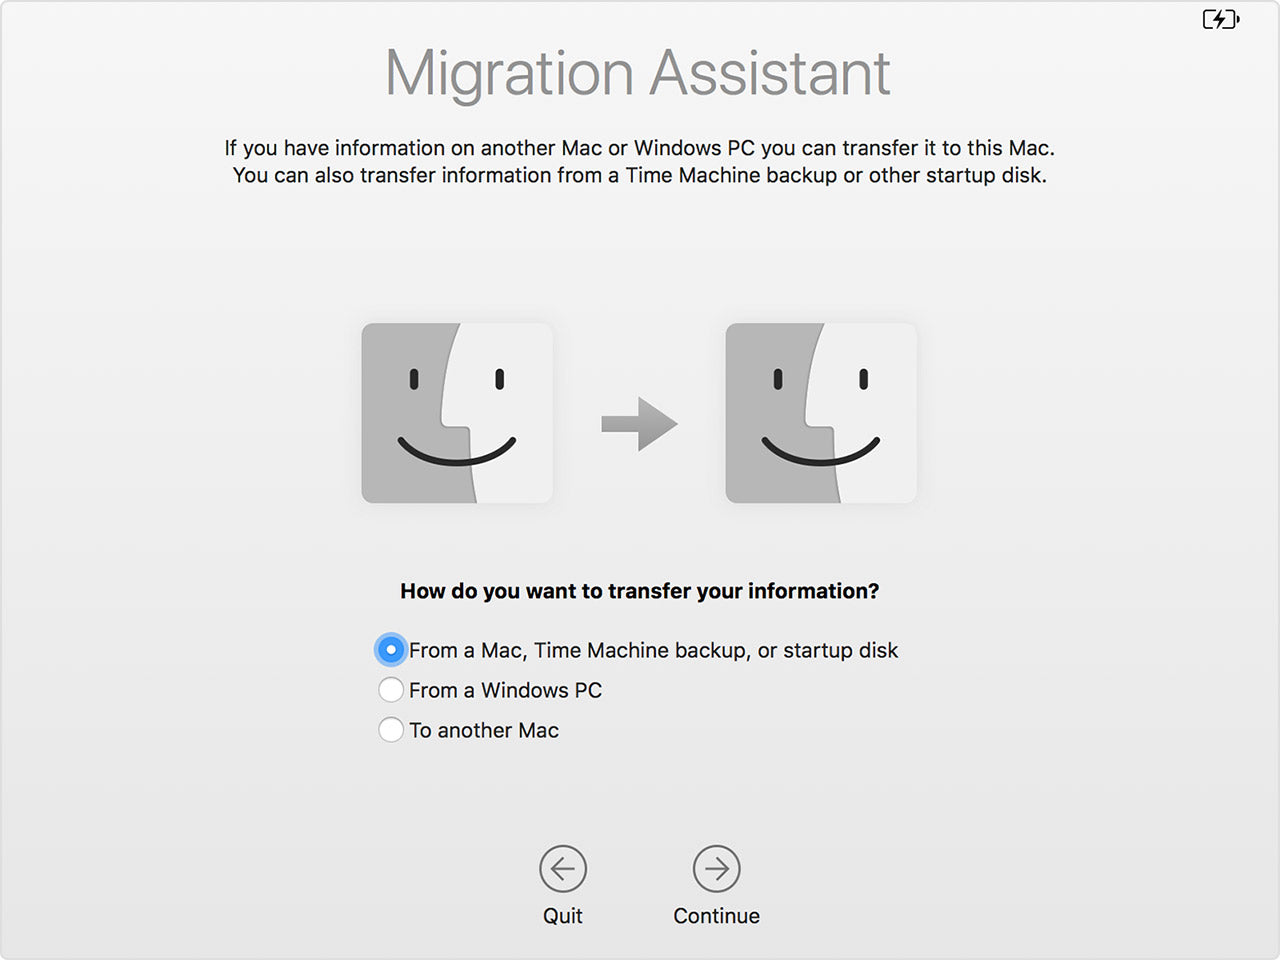
If you have installed a new SSD, you can use either your old hard drive in an external enclosure or a Time Machine back up as a source for Migration Assistant.
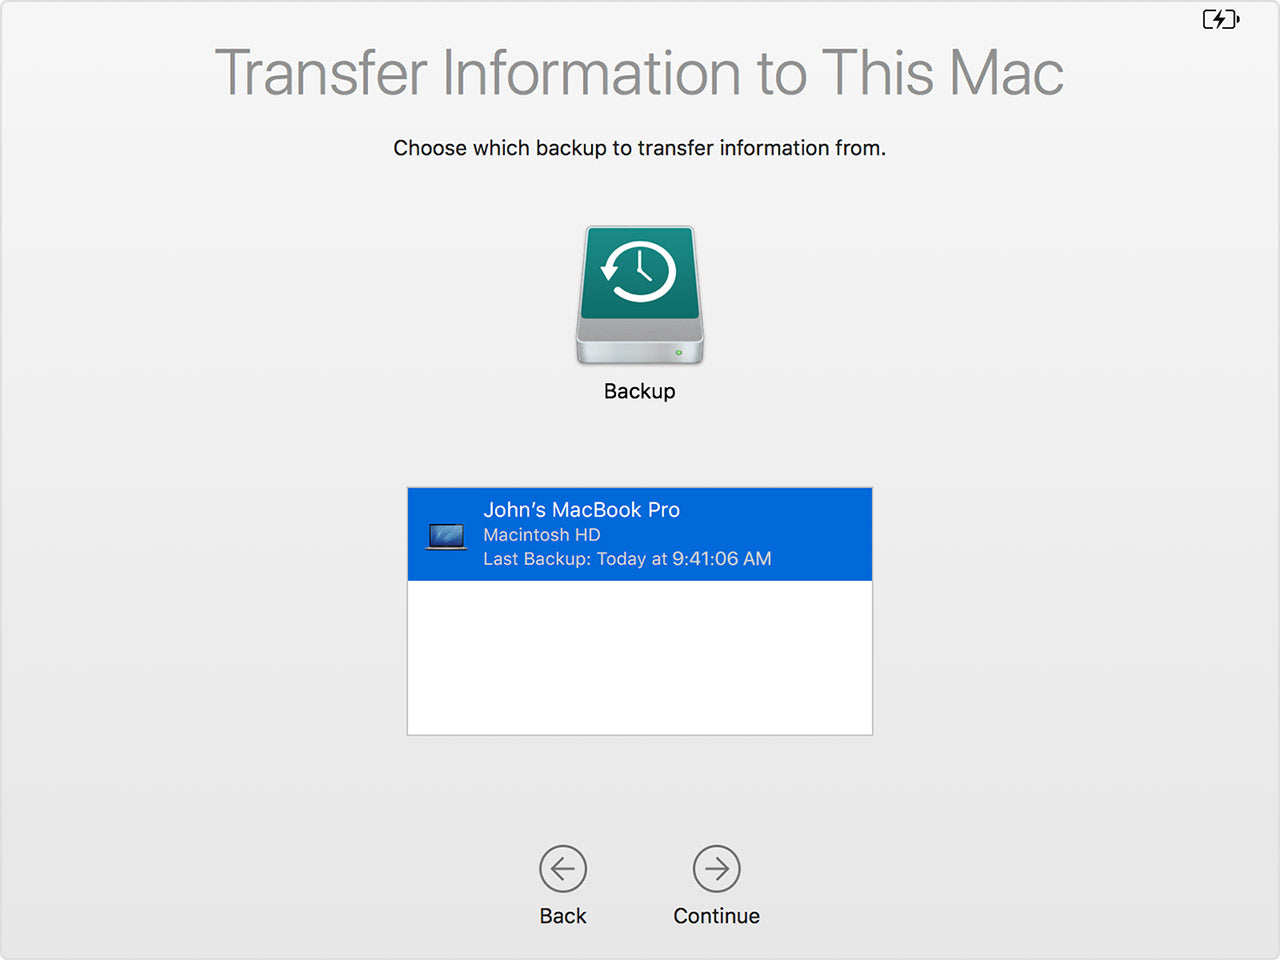
The example in the image below, a Time Machine disk is connected and to be used

Select the machine you want to restore from in Time Machine
Then select the type of data you want to migrate
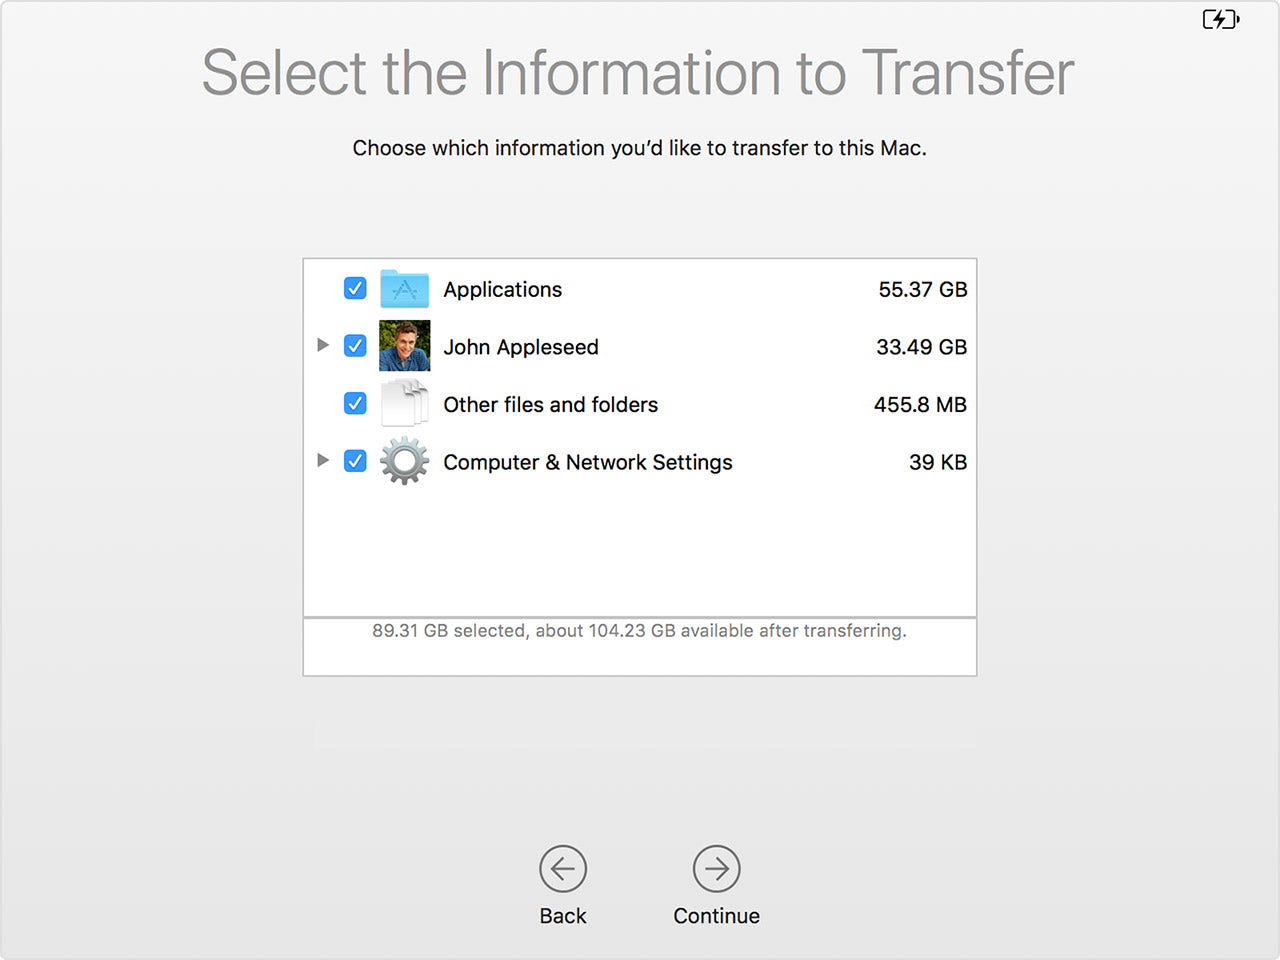
That is it! You should have a new macOS with all your applications and data restored back on the system.
Time Machine: why you should use it
Time Machine has many features that can make your life easier when upgrading to an SSD.
You should be backing up on a regular basis and Time Machine is Apple's built in back up software that is easy to use.
To create backups with Time Machine, all you need is an external storage device. After you connect the device and select it as your backup disk, Time Machine automatically makes hourly backups for the past 24 hours, daily backups for the past month and weekly backups for all previous months. The oldest backups are deleted when your backup disk is full.
If you connect a new external drive to your mac you should see this window pop on the screen

If you dont get the pop up you can go to Time Machine app and select disk or add Disk.
The software will set up automated back ups. If you periodically connect the Time Machine, if it does not automatically start you can start a backup manually, choose Back Up Now from the Time Machine.
First the most asked question we get: Does Time Machine back up the operating system or macOS?
If your Time Machine is backing up your whole drive, yes the macOS is backed up. You have a complete back up of your Mac. You do not have to download macOS to use your Time Machine. In Sierra and High Sierra we have seen Time Machine go off to the Apple website to verify or update core files. It is not totally understood what is happening, but it is not uncommon for Time Machine to get additional files from the Apple website before restoring a Time Machine back up. Usually these files are to do with the recovery partition on the Time Machine or the Disk Utilities page.
Restore on a new SSD and the Double Clone
One of the best features of Time Machine is you can you it to restore to a new SSD. We have outlined the process in our Four R Restore from Time Machine. What if you dont have a Time Machine and/or you have not been backing up your data? No judgement here, but here is a way to fix all that. We call it the Double Clone.
The Double Clone
Instead of ordering a clone cable or an external clone case, you buy an external drive. A 1tb or 2tb drive is a good size, the major brands are Toshiba, Seagate, Verbatim or Western Digital. You dont need the SSD version, just a standard external drive.
Format the external drive. Use Carbon Copy Cloner to clone your Mac onto the new drive. Install the new SSD. Restart the Mac holding down the Option key. Select the new cloned external drive. You are now running your Mac off the external drive. Use Disk Utilities to initialise the new SSD. Open Carbon Copy Cloner and do a second clone, this time from the external drive to the new SSD. When the clone if finished, shut down the Mac, remove the external clone and restart the Mac. Go to System Preferences and set the start up disk to the new SSD. Open Time Machine, plug in the external drive, if you don't get the pop up window asking to turn the drive into a Time Machine, then select disk or add Disk and start a new Time Machine. Please note it will erase all the clone data, be sure your new SSD is working as expected before erasing the clone. That is the Double Clone: get a new SSD and a new backup system with Time Machine!!
Rebooting off Time Machine
Time Machine does not have a recovery partition, however you can use it to restore your Mac or install a new macOS. If you want to use Time Machine in this way, plug the Time Machine into the Mac, then restart the Mac holding down the Option key. This loads the boot manager and you can see all drives attached to the Mac. The Time Machine should display as an external drive. Select it and the Mac will build a macOS Utilities page that will have Disk Utility (to initialise a new drive or erase a current drive) and install a new macOS.
How to create a macOS USB
There are a lot of options to create bootable USB to install macOS. We use the recommended method from Apple.
This is our summary of how to make a macOS USB drive. With this drive you can install macOS on a blank SSD or boot from this USB and use the tools and utilities to check or format a Mac drive.
Download Ventura
Go to the App Store, search for macOS Ventura and download. After it has downloaded it should appear in your Applications as "Installer MacOS". If you have already downloaded and upgraded, you will need to download the MacOS again (Apple deletes installer once it has been used).
16GB USB
You need at least an 16GB USB drive. For best results use a USB 3.0. You can use an external hard drive (note: any data on the drive will be lost as it gets formatted). Go into Disk Utilities and rename the USB to "upgradeable". You can erase and rename. The MacOS creation method will reformat the drive, so it does not need to be any specific format type like Fat32 or Mac Journaled. What is important is the name of the drive, as it is used in the code below.
Using Terminal
We are going to use the command line app called Terminal to create the MacOS drive. Don't worry if you have never used it, it is very easy, not that scary. Open Terminal, it is found in the Utilities folder in Applications.
Copy this code
sudo /Applications/Install\ macOS\ Ventura.app/Contents/Resources/createinstallmedia --volume /Volumes/upgradeable
Paste the code
Paste the code you copied into Terminal and hit enter. It will ask for your system password (usually the one you log on with at start up). Type Y
and return when it asks if you want to erase this drive. When it is
finished creating it will display "Copy complete". You can close Terminal.
How to use the USB
When the USB or external drive is plugged in, restart the Mac holding down the Option key. The USB will appear on screen as Install MacOS. Select and hit return. You do not need to select a network. If you are installing the macOS on a new SSD it will need to be initialised. Go into Disk Utility, Erase and name. Proceed to install macOS.
Other macOS codes
Monterey
sudo /Applications/Install\ macOS\ Monterey.app/Contents/Resources/createinstallmedia --volume /Volumes/upgradeable
Big Sur
sudo /Applications/Install\ macOS\ Big\ Sur.app/Contents/Resources/createinstallmedia --volume /Volumes/upgradeable
Catalina
sudo /Applications/Install\ macOS\ Catalina.app/Contents/Resources/createinstallmedia --volume /Volumes/upgradeable
Mojave
sudo /Applications/Install\ macOS\ Mojave.app/Contents/Resources/createinstallmedia --volume /Volumes/upgradeable
High Sierra
sudo /Applications/Install\ macOS\ High\ Sierra.app/Contents/Resources/createinstallmedia --volume /Volumes/upgradeable
How to initialise an SSD
When you get your new SSD it is uninitialised. This means it can be used in a Mac or PC. It needs to be initialised before use. In the PC world they call this formatting the drive. In the Mac world it is called Erase and it is a function of Disk Utilities
Disk Utility is a tool included in many places. It is found in the Utilities directory in Applications. It is included in any macOS install app. It is found in the recovery partition on a drive when a Mac is restarted holding down the keys Command + R. It is also a part of the Internet Recovery boot up. There are many reasons why you would want to erase a drive, this guide is focused on initialising a new SSD, however for readers who are looking at general information we have added the following warning...
Warning: Erasing a disk will delete all data on the disk. Never initialise/erase a drive that has data on it that you want to keep. I know that sounds obvious but you would be surprised with the support calls we get :-). Four steps to initialise a new SSD.
New APFS format in High Sierra and Mojave
Starting from macOS High Sierra, Apple have a new format called APFS. It is recommended to format your new SSD in APFS if you will be using High Sierra or above. APFS is optimised for SSD drives. If you are using macOS Sierra or below, the recommended format is still Mac OS Extended (Journaled).
Open Disk Utility
When you start Disk Utility, in the sidebar are the drives attached to the Mac. Select the disk name, not the indented volume name.
Erase button
Click on the Erase button. If there is no erase button select the drive again.
Options
There are two to three fields that need to be selected.
Name: Enter a name for your disk, such as "Macintosh SSD"
Format: Choose APFS (for High Sierra or Mojave) or Mac OS Extended (Journaled) for earlier macOS like El Capitan
Scheme (if available): Choose GUID Partition Map
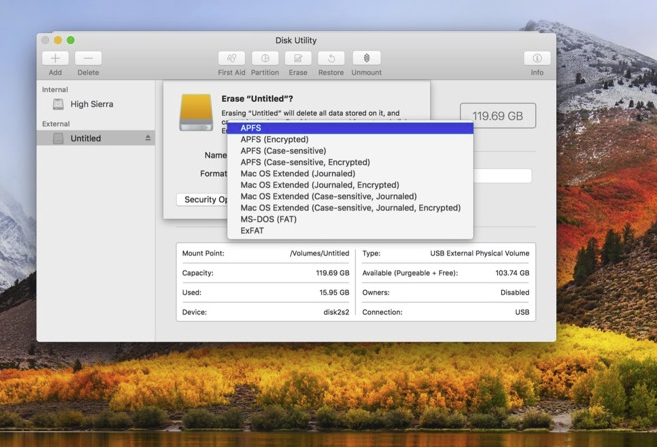
ERASE
Click the Erase button and the SSD will be ready to use.
How to clone with SuperSuper!
Please note: this process cannot be used to clone a Windows partition created by Boot Camp. We recommend WinClone by Twocanoes Software. It is commercial software requiring a license to use, however it is not affiliated with our company and that is not an affiliate link.
Before cloning, the SSD needs to be initialised, if that has not been done, please follow our instructions above.
The process is really only two steps...download and run. Superduper! is very simple but powerful piece of software.
Download and install
SuperDuper! software by Shirt Pocket (free download).
When the download is complete, install in your Applications folder.
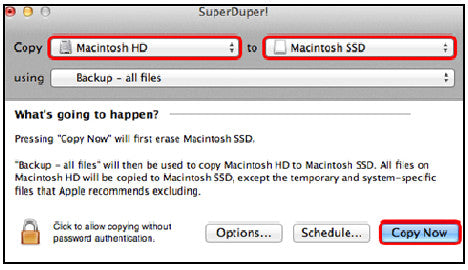
Double click on the SuperDuper! icon to run
Clone
Choose your source (Macintosh HDD) and destination (Macintosh SSD) drives. Click Copy Now to begin. You will be notified when it is complete.
My cloned drive will not boot
From Big Sur macOS Apple introduced "Signed System Volume". This means only a disk "sealed" by Apple can boot. The cloning software we recommend uses Apple's replication utility to make a duplicate but we are still getting reports of cloned drives that will not boot. If you are having an issue, here are some troubleshooting tips.
macOS install
If you have cloned your drive, after installation, it will not boot, the quick and simple solution is to reinstall macOS. Now that the OS is in it's own separate disk volume, reinstalling the OS does not affect the data on your drive. To get the latest macOS, restart the mac holding down the keys "option" + "command" + "R" and the mac will use internet recovery to download the latest OS that will run on your mac. Choose option install macOS and follow instructions. Do Not format or initialise the drive.
If you want a specific macOS version, you can only do that by creating your own macOS USB installer. See instructions above.
Start again
Install macOS and there is an option at the end of the install to transfer data from another Mac. Connect your old mac drive, transfer the data onto the new macOS.
Simple Questions answered
Is the SSD the same physical size as my current hard drive?
Yes. The standard Apple Mac Mini 2006-2012 hard drives are an industry standard 2.5 inch notebook drive. They are physically exactly the same physical size.
Can I use any SSD here to upgrade my 2014-2019 Mac Mini?
No. From 2014 the Apple Mac Mini SSD was a proprietary NVME SSD. The 2019 Mac Mini SSD was soldered onto the motherboard and can not be removed or upgraded.
Does the 2014 Mac Mini use a standard M.2 SSD?
No. It is only standard in it's physical size. A standard M.2 drive will not work. Apple has made their drives proprietary.
Are the 2.5 inch SSD drives faster or better the larger the size?
All our current SSDs are the same speed and quality. The 250GB is as fast as the 2TB.
Do I need a bracket to install the SSD?
No.
Can I do this install myself?
Yes. We have had customers of every type of experience: students to pensioners do this upgrade. It is only slightly more complicated than a RAM upgrade.
Do I need any special tools?
For the pre 2013 models you need a small phillips screwdriver and a Torx 6 screwdriver. These are standard tools, found in many kits and available at hardware stores like Bunnings. Everything you need is in our screwdriver tool kit. The Aura SSD kits include all the tools you require.
Can I clone a bigger drive onto a smaller SSD?
No. If you have 900gb of data on a 1TB hard drive, you can not clone this onto a 525GB SSD. The cloning software we recommend does not selectively clone. It is all or nothing.
Does the hard drive and the SSD have to be the same size?
No. As long as the source (current hard drive) has less data than size of the new SSD. So 300GB on a 1TB hard drive will clone onto a 525GB SSD.
What size SSD should I buy?
We recommend you look at how much data is on your hard drive and then get an SSD at least 20% bigger than the data you have. We have found the optimal free space for an SSD to work with virtual and swap files is 20%. Aim for 30 to 40%. It all depends on your work flow and how much data you store and delete.
Can SuperDuper! clone a windows parition?
No. We recommend Winclone for this type of clone.